I love those cheese cracker sandwiches with peanut butter inside of them, and could easily eat a dozen before I thought about it, if I let myself. Which, of course, I don't. So I wanted something that might be reminiscent of those, that was cheap'n'easy of course, but a little better than cheese baked until crisp and schmeared with peanut butter. And these little gems definitely fill the bill! 2c finely shredded cheese (I used mild cheddar - next time I'll use sharp)1c light peanut flour2 flax eggs1 tsp baking powder1/2 tsp salthot waterLine a 14x20 baking sheet with parchment paper; spray with nonstick cooking sprayToss first 2 ingredients in a mixing bowl; add the next 3 ingredients and mix well with hands to form a soft dough - if dough is stiff or crumbly, add hot water by the tablespoonful until it is soft enough to work with easily. Spread dough on parchment-lined pan; pat down as flat as possible with wet hands; cover with sprayed plastic wrap; roll out until dough is thin and even; this will take the dough all the way to the edges of the pan and shape it naturally into a rectangle about 1/8" thick. Place in 175 degree oven overnight. Break apart to eat. (If you want perfect squares, wait until crackers are set but not crisp and score with a knife. I don't care about perfect squares.)These hold up to being spread with room temp butter or cream cheese or peanut butter. They are also great topped with some tuna salad or, I'd imagine, any other kind of salad. And they are great all by themselves!It took me about 10 minutes to make the recipe, from lining the pan to putting them in the oven. Very very easy, and definitely worth the time!The entire recipe has about 18gN carbs and cost me a little less than $2 to make. So far it has lasted - just stored at room temp on the countertop - 5 days and we've nibbled and munched our way through about 3/4 of them.
I have blogged these before, but was asked for the grain-free breads that I use, so I'm posting them here to make them easily accessible. The first is my variation on Oopsie Rolls. I like them but they were just a tad too eggy for me. I use the Oopsie recipe but to the yolk mixture I add a tablespoon of either almond flour, or golden flax meal, 1/2 tsp of xanthan gum, a drop of liquid sucralose (you could use the sweetener of your choice - not enough to sweeten, but enough to add another layer of flavor), and 1/8 tsp of salt. These additions are enough for me to get a breadier texture and taste :). The 2nd is my variation on similar grain-free breads:Beat 1 large egg in a buttered bowl; the bowl should be the shape you want your bread; mix in well 1 Tbsp sour cream or plain yogurt. In another dish, whisk together 1 Tbsp golden flax meal and 1 Tbsp almond flour, plus 1/2 tsp baking powder, 1/8 tsp salt.Combine the two; add enough very warm water to make a thick (barely pourable) batter; let stand for about 5 minutes; microwave for 60-90 seconds, depending on your machine. Let cool a bit, then tip out of bowl; cut horizontally to make 2 slices.I love these when they are toasted! Sort of like a very light english muffin :).Either of the above can be made sweeter, add cinnamon, or have other variations of your choice. If you do a search on Oopsies you find forums where numerous variations are described. The other recipe that I make on occasion, also grain-free, is Maria's "Healthified" Sub buns, which I've made in various shapes and sizes. (When I make these, I simultaneously make a nice custard with all of those yolks, just by mixing in a whole egg or 2, some cream, a dash of salt, some cinnamon, and sweetener, then baking in a water bath alongside the pans of buns until just set.) The other bread that I sometimes use (but which isn't grain-free and are eaten more by my husband than by me) is my Lovely Loaf - it is amazingly delicious, but does have wheat in it so I don't make it as much. Hopefully one of these will satisfy your desire for a sandwich or a piece of toast now and again :).
 I started the day with some cheese melted in butter with bacon, so naturally I wasn't hungry for many hours. Later this afternoon I nibbled on some ham slathered with full fat mayo.
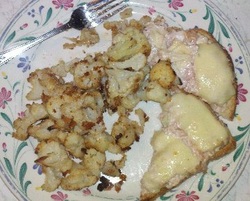
Tonight I didn't want a huge supper so this was it. Tuna salad (just canned tuna, mayo, and some chopped onion) on a slice of store-bought low carb bread (which I hardly EVER eat!), with some slices of swiss on top, put under the broiler. And some frozen cauliflower chunks, tossed with olive oil and sea salt, put on the top shelf of the oven @ 400; tossed when starting to brown with parmesan (from the can) and garlic powder, then left until golden brown with crispy bits.
A lot of food on my plate, too much for me actually, but have plenty of leftover cauliflower to reheat for snacking tomorrow.
Sometimes the simplest meals are the best!
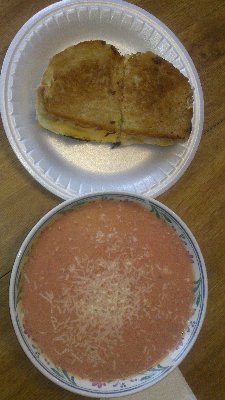 This was our Christmas Dinner. The sandwich wasn't low carb. Well, it wasn't TOO bad, at about 30gN per big slice of bread. You can see how huge it was on this 9" plate - I ate half of a sandwich (or 1 slice). The bread was sourdough, and it was fried in loads of butter, with 5 kinds of cheese inside. And that's all I'll say about that!
Parenthetical note, without the parentheses: On special days, when I eat carbier, like Christmas, I still try to keep my total carbs under 100gN. Today I had probably half of that. Just a steak for supper later. YAY for me!
I've posted a tomato soup recipe before, and it will end up here eventually, as I'm still working - but not very hard - at moving all of my recipes here from my old blog. Anyway, I made it differently today, and I think it's even better!
Here is how I made today's version:
2 large cans crushed tomatoes (NOTE: if you are here from the NF group and want to eat this during early healing, substitute tomato sauce so there are no chunks or seeds!)
1 big can of tomato juice
24 oz container of full fat ricotta cheese
7 drops EZSweetz (or equivalent)
1/4 tsp cinnamon
1 tsp salt
1 tsp white pepper
1 tsp onion powder
1/2 tsp garlic powder
2 Tbsp dried basil flakes
2Tbsp balsamic vinegar
pint of half'n'half
grated asiago for garnish
Using a BIG pot (mine was bigger than a dutch oven and about 2/3 full), warm the first 2 ingredients until they steam, stirring to prevent scorching; this will make the cheese melt more easily.
Whisk in the ricotta cheese until fully melted.
Whisk in remaining ingredients EXCEPT half'n'half and asiago; keep whisking as you bring soup back up to a simmer.
When fully blended and starting to simmer (it will be pretty thick at this point) stir in the half'n'half and return to a simmer. Once it is simmering, lower heat to medium low, cover, and let simmer, stirring occasionally, for 15-20 minutes.
Ladle into soup bowls; grate asiago cheese over the top.
I've looked at so many ketchup recipes online but frankly, for someone like me who wants "cheap and easy" my eyes just glaze over. I am not a ketchup connoisseur by any stretch of the imagination; I just like to slather something on my burgers or dip my steak into. (If you ARE a connoisseur, by all means feel free to stop here, before your sensibilities are offended!) Early in the spring we scored a dozen bottles of Heinz low carb ketchup at an Amish store really cheap. I'm sure I blogged about it, as I did keep track of all of my food purchases throughout Jan-June of this year...anyway, they were well under a buck if I remember correctly. Anyway, last week we ran out, so I had to buy more. But in the meantime apparently Heinz shrunk the bottle AND raised the price! So I'm not buying anymore. Period.And that leads us to tonight. With steaks in the broiler I didn't have time to mess around with long ingredient lists and lenthy instructions. So (which I usually do anyway) I just went to work...As I've stated before, I don't measure. I just DO. So these measurements are approximate. You can just put them all in a bottle or jar, and shake or mix it all together. (NOTE: this will be thinner than regular ketchup; that doesn't bother me at all but if you want to thicken it up, let me know how you do it ok?)1 sm. can (8 oz) tomato sauce2T Worchestershire sauce1/4t sea salt1/4t garlic powder1/2t onion powder2 drop EZSweetz (liquid sucralose, equal to 4tsp sugar)1 drop stevia glycerite2 tsp. apple cider vinegarThat's it. Seriously. That's IT!My husband was also pleasantly surprised, and delighted. I hope you will be too!
When making yogurt, the biggest thing is making sure everything you use is squeaky clean so you don’t grow the wrong “bugs”.
I boil water in my dutch oven to sterilize it, stir my big spoon around in it, then pour the boiling water into my gallon thermos and put the lid on, then set it aside.
In the dutch oven I bring my “milk” (a gallon of whole milk mixed with a quart of heavy cream works great, and you have some of the mixture left over for sauces, your coffee, or whatever!) almost to a boil but not quite, stirring constantly; you heat it over medium until there are little bubbles around the edges, and it starts to steam. If it scalds at all it won’t culture (you can either make a vat of soup or throw it away if it scalds), so you can’t really do it more quickly over high heat…but it goes a little faster if you bring it to room temp first.
Remove the “milk” from the heat and let cool until a skin forms on the top. Remove that, then in a small bowl temper about 1/4-1/2 (I don’t measure) plain yogurt with a little of the warm milk, then stir it all into the pot.
Pour the extremely hot water out of the thermos, immediately add the milk mixture back into it, cap it tightly, and set it on top of the fridge for about 24 hours. I've left it up to 36 hours, and have eaten some at about 20 hours...it's all good...
It’s very easy, the most tedious part is the stirring.
(Just as a side note: before I start this I put some baking soda and some vinegar into my kitchen drain; it bubbles while I work, and then after I pour the water out of the thermos the drain and pipes are fresh and clean! Just sayin’…)
You can flavor it in your dish with just about anything, sweeten it, or whatever when you serve it. My favorite way to eat it is with a drop of liquid sucralose, a splash of vanilla, and a generous sprinkle of cinnamon.
Once you taste your own yogurt - rich and satisfying, creamy and thick - boughten will always taste like a cheap imitation!
I will start moving my recipes here from my blogger pages, and hope to have them all moved by the end of the year. I will also save the entire blog from over there to a pdf file, which I will make available for download, if anyone would like it. It will contain my menus, past shopping lists/costs, and general lowcarb-related posts; I don't think that the program I'll be using will save all of the comments that were posted to the blog, I'm sorry about that... As of the 1st of the year (2013) I will be blogging only here, and no longer at my blogger site. In the meantime, what you see here will be copies of the recipes I had there, ordered by date as they were originally, and I plan to add some photos as well, if I have them available. (I'm usually too impatient to take pictures of my meals before I eat them!) And that's that :).
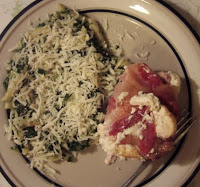 Tonight I made a "triple meat" dish. Sounds strange but was SO GOOD! As always, super easy...not as always, a little pricier - but I didn't have to buy the can of crab meat ($2! I'd never buy it!)
I started with b/s chicken thighs, which I flattened. Onto each piece I put a generous blob (technical culinary term) of a mixture of cream cheese and crab meat - 1 block and 1 can, respectively. Then I rolled them up, wrapped them in bacon, and stuffed them - literally - in a Pyrex loaf pan; after 90 minutes in a 325 oven they were done. SO EASY but fancy-looking and delicious! No seasoning required.
With it I served some Dreamfield's penne pasta tossed with chopped spinach and butter, seasoned with sea salt, and sprinkled some Italian blend shredded cheese.
GREAT MEAL!
For supper I made a fish dinner, photo below. The sauce is simply mayo with a little dill weed, a splash of lemon juice, a sprinkle of Old Bay, and a little cream to thin it out. I also roasted (with olive oil and sea salt) a mixture of parsnips, zucchini, and brussels sprouts, and made my lovely cole slaw.* The fish is a lightly breaded fish from GFS, about 15gN per piece. Cost is about 30 pieces for $19.95 - MUCH less expensive (and less carby!) than going out for fish dinners at the restaurant!
*My cole slaw recipe - I buy great big bags of shredded cabbage at GFS for under 5 bucks. Using some of that, I add a sauce of mayo/cream (3/1 ratio, approx.) which I whip - then a generous amount of seasoned salt and splenda to taste. Simple, and whipping it helps keep the dressing from running to the bottom of the bowl.
Last recipe post for the day - and probably for the week :). This is one I threw together because I had an intense craving for Mexican food. It's maybe a little carbier than some of the others but was definitely worth it - and tasted even better reheated the next day!
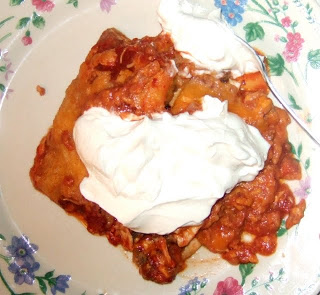
I put some enchilada sauce (carb-cheap! who knew?) in the bottom of an 8x8 baking dish, then a low carb tortilla onto which I'd spread some refried beans, then sprinkled a handful of shredded cheese on it and spooned some sauce over; then another tortilla, layer of crumbled ground beef that had been browned with chopped onion, cheese, and sauce; another tortilla/beans/cheese/sauce; another tortilla/beef/cheese sauce; and a final tortilla with beans, then sauce again, and topped it with a big handful of shredded cheese. Baked it in the oven at 350 for 25 minutes, or until the cheese started to brown on top, then served it with a generous heap of full fat sour cream on top.
This was EXCELLENT! The photo below shows one serving, or 1/8 of the entire recipe. I haven't figured up the carbs yet because I threw away the cans for the beans and the sauce without thinking. Certainly the tortillas (7gN each) and the beans were the carbiest parts, and if I had to try to remember what the cans listed for net carbs, and do the math in my head, I'd say there were close to 100gN in the entire recipe, plus the sour cream...but that's 8 portions, so only 12-13 per portion, plus sour cream. But that could be way wrong :).
Here's a photo, you can see that the servings are plenty big!
|

 RSS Feed